
The last major job outstanding on the cob bathroom is now complete. The floor. It’s been a slow process, finishing it off between major renovation works on the other two buildings, but slow progress is still progress.
The floor started off as the bare earth within the foundations.

We then removed most of the soil to take the level down to the rubble trench foundation, and filled the space with Leca (lightweight expanded clay aggregate) to within 10cm/4″ of final floor height. That was it. Just Leca. Leca as a subfloor provides both insulation and, if deep enough, a barrier to water rising up into the floor.

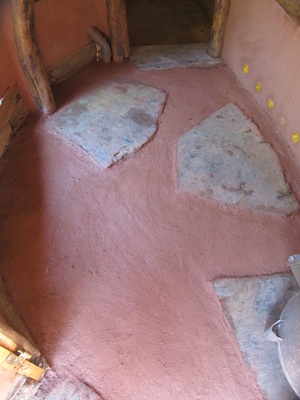
We then laid some schist slabs on a clay mortar bed in the areas of likely heaviest wear – in front of the basin, the bath and the composting toilet – plus a schist step at the change in level between the toilet and main bathroom, and a slab beneath the wood burning water heater or bailarina.


For most of the year we’ve been using the bathroom just like this with wooden planks over the Leca. It wasn’t part of the plan, but leaving it this long without laying the rest of the floor was very useful. It allowed me to monitor the floor and make sure no water was finding its way to anywhere it wasn’t wanted. The ‘wet wall’ of the bathroom is the original terrace wall, complete with mosses and lichens, so there’s no way of preventing water from the shower finding its way down to floor level – the idea was to simply provide good drainage. The bath itself is set in a bed of Leca, and the water drains down through it to the bedrock below the subfloor, follows the slope down, seeps through the rubble trench foundations, and away. Throughout a wet winter and spring and with a well-used shower, the top layers of Leca remained bone dry, so I was confident I could lay the earthen floor with no trouble.
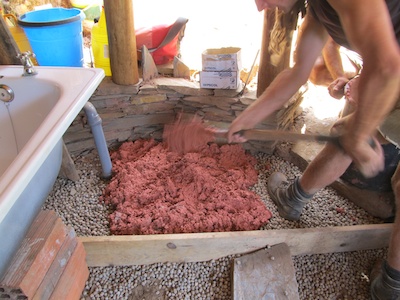
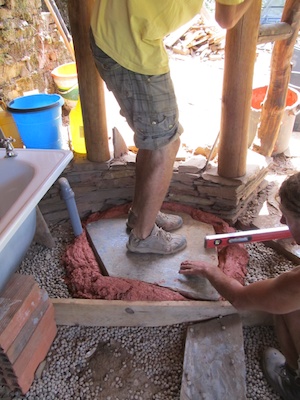
For the first layer of the earthen floor, I mixed some cob to the same recipe and consistency as we used to build the walls. From my reading on the subject, I gathered most earthen floors are mixed to a pourable consistency, so they are largely self-levelling. I didn’t need that here – the schist slabs provided my reference points for the final floor levels and the spaces in between were small enough that laying a level surface would be simple – and I wanted a surface that wasn’t completely level but which echoed and followed the slight unevenness in the surfaces of the schist slabs. A stiffer mix would dry faster with minimal cracking and we could walk on it while it was drying to compress it well before the final layer was added.
I filled the floor to within 1cm/½” of final floor height, using only my hands to push it into shape and level it off. I left it to dry completely before adding the final layer. With daily use once it was dry enough to walk on, the floor set up really well, drying solid and firm with minimal cracking.
For the final layer, I used the same recipe we used to plaster the walls, but mixed to a slightly stiffer consistency. The floor was thoroughly wetted down, left to sit overnight, then wetted again and scored before application. After the initial trowelling out of the mix, I left it to dry until leather hard, then polished it with a small flexible Japanese steel plastering trowel to produce a smooth finish. As the floor dried out, any small cracks were wetted down and polished with the trowel again as they appeared and, if necessary, a small additional amount of wet material worked in and polished smooth.
Finally I worked around the schist slabs with an old vegetable knife and palette knife to smooth and consolidate the edges of the floor where it meets the stone.
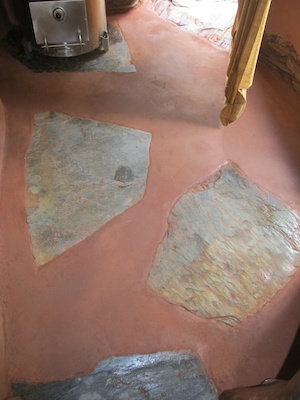
After it was thoroughly dry, I gave the earthen floor several coats of linseed oil. The schist slabs got a single coat. The oil was applied until the floor would absorb no more.

When the oil had thoroughly cured, I then applied a coat of wax. I used the same recipe I used to treat the wood in the building. This recipe is a softer wax than the beeswax/carnauba wax recipe I used for the wooden floors in the wee house and I chose it because it’s easier to work in to the surface of the floor with your hands. The schist slabs got a coating as well.

The wax takes a couple of days to lose its tackiness and harden up, but once it’s done so, the floor takes on a subtle silky sheen and resists water very well. The oil and wax on the schist bring out the full range of colours in the stone without it looking overdone. I’ll see how this holds up, and maybe add a further coat of the harder wax if necessary later on.
Previous posts in this build …
Andrea November 25, 2013
It’ a beautiful colour.
michelle January 29, 2016
we are seriously considering clay for the floor of the granite building.The interior surface is bare soil .We are going to dig it out and level it a touch but need to be able to use it as soon as roof goes on….what are your thoughts?You know the building.If a clay floor was to be laid we would not be in the position to start until sept really-too late in the year in terms of temps etc?Live with lecca for winter ,see how it handles any damp coming up?
Quinta do Vale January 29, 2016 — Post author
Depends on the weather really. If it’s going to be a wet winter (and we’re due a wet one, but who knows these days?) then the floor probably won’t dry properly. If it’s a warm dry September and stays that way through to December (which it did this year) then you ought to be OK. It’s not easy to live with the LECA – it’s very mobile! I did in the bathroom, but it’s a small area and even then it was easy to fall off the boards I put over it and end up floundering in the stuff. It was good to see that no moisture came up through it, but if you have 3″ or more you’ll be fine. If weather permits, I’d probably go for the initial cob layer. Then you can finish it the following Spring, filling in any cracks, etc, that might have developed, and then oiling in drier weather?
Alexandra David October 28, 2021
Hello, we just finished an earth floor and are preparing for the linseed oli part.
I am curious to know how much wax/oil mix (bees, carnauba, oil) is necessary for a floor that is as big as 15 square meters ….aprox at least.
And is carnauba a must or just bees wax will do it.
Thanks?
Quinta do Vale November 10, 2021 — Post author
Hi. I couldn’t possibly tell you. I just make it as I need it. You don’t have to use carnauba wax but the wax finish won’t be as hard with just beeswax.