
We’ve been moving on with the cob bathroom. See the previous post in this series for the first part of the build.
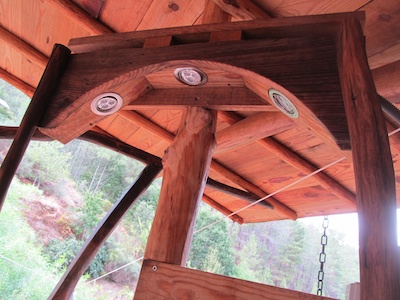
Having successfully established the principle of putting the roof on first in case it rains (maybe I never got over Enid Blyton’s Big-Ears scoffing at Noddy’s impeccable logic?) we’ve carried on with fittings, electrics and plumbing so all can be thoroughly checked and tested before being built into the walls.
Back wall
First, there was the back wall to complete. This is how the original wall ended. Whether it was roughly built this way or at some stage was partially destroyed by the growing oak tree is difficult to determine, but at any rate it had to be closed off before the cob walls were built.


It was slightly intimidating and I wasn’t sure my neophyte wall-building skills were quite up to it, but once started it was a lot easier than it looked.
The wall is now finished, complete with drainage gutter behind to take rainwater runoff coming off this part of the roof away beyond the building. The random outer edge to the wall is deliberate. Once the cob wall is in place, it will have a softer, more natural appearance than a straight edge, encouraging plant and moss growth on all the exposed stone faces and eventually blending into the slope behind.

Bath
We built a support structure for the bath out of old chestnut timbers. The bath itself will be mostly cobbed in with a rubble channel down the back for water runoff and a layer of insulation (Leca, lightweight expanded clay aggregate) between the cob and the tub. There will be a splash-proofed dividing wall separating the bath from the toilet alcove and a windowed shelved niche in the external cob wall at the tap end, separated from the wood-burning water heater by an internal cob wall, thus giving the bath its own cosy enclosure.

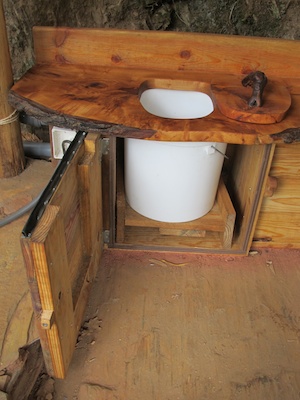
Basin
Among the things I brought out from Scotland when we moved here were some slabs of Scottish hardwoods I’d got in return for a graphic design job for a friend. Among them were two pairs of matching slabs of lime. The Portuguese climate hasn’t been kind to the wood: although the slabs were well seasoned, the relative humidity here is so much lower than Scotland that, despite being stored carefully in a well-ventilated building, the slabs have warped as they’ve lost moisture. This made them unsuitable for any exacting furniture construction, but perfect for situations where a slight wiggle would be well within tolerances. I decided to use one pair to make a matching compost toilet cabinet and basin surround because they happened to be the perfect size and shape for both applications.
I also had a plain hand-made glazed earthenware bowl which, with some careful cutting with a hole saw, we successfully turned into a basin. An old tyre inner tube was used to make a seal between bowl and wood. It was ideal for the purpose as the rubber could be folded and adjusted in thickness to accommodate the unevenness in the wood.


The basin and its counter are supported on a super-solid framework of old chestnut – we ‘just happened’ to have two pieces of similar width with matching curves to make the legs – and will be set partially into an arched niche in the cob wall for which we’ve installed a lintel with LED downlighters, chestnut branches to form the edges of the niche and a wooden mounting plate for the power point and light switch.
Compost toilet
The compost toilet, like our other toilet here, is based on ‘humanure’ guru Joe Jenkins‘ bucket-in-a-box composting toilet system. In the three years we’ve been using this method of sanitation now, I’ve never once considered using any other. For me, its simplicity and ease of installation and use makes its choice a complete no-brainer. Plus you can get as imaginative as you like with cabinet designs!
The cabinet design for the bathroom was concocted between João and me and constructed by him while I worked on the finishing of the matched lime slabs. It’s divided into two parts. The left compartment holds the 20-litre plastic buckets we use as collectors. The front of the cabinet is a hinged door and the buckets slide in between angled guides to stop dead centre under the opening which was cut using a standard toilet seat as a template.
This side of the cabinet is sealed pretty much airtight from the interior of the bathroom and ventilated to the outside of the building using 50mm waste pipe. There are two pipes so air can be flushed through the cabinet. One exits straight through the wall at foundation level, the other under the eaves, so whichever direction air flow is inclined to go, up or down, it’s free to do so. The old inner tube came into its own again, along with some trimmings from the zinc coverings on the roof barge boards, to make a custom seal for the top of the door capable of adjusting to the warped underside of the lime slab.
This is the first time we’re installing vent pipes for this toilet system. It’s not really necessary at all – we’ve very rarely had occasion to wrinkle noses using this method and when we have, it’s generally been down to a combination of temperatures climbing into the 40s and visitors unfamiliar with using composting toilets – but it was so simple to add this extra refinement that it seemed silly not to.
The right hand compartment is a lidded storage bin for toilet cover material. We use fine sawdust collected free from the initial processing section in the local woodyard.
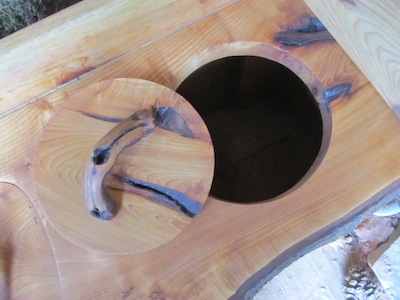
The lids to each compartment were cut from the slab at an angle, so they sit snuggly in place. Handles were made from grape vine prunings.

I spent a long time sanding the lime slabs by hand. It’s beautiful wood and worth the effort. After sanding, it was first treated with 3 coats of raw linseed oil, followed by one coat of 70% linseed/30% turpentine (turpentine – aguarrás – is a product of the ubiquitous Maritime pine, so easy to find in quantity in Portugal), then another coat of a 50-50 linseed-turpentine mix.
I then made a wax treatment from natural beeswax, raw linseed oil and turpentine for the final coat and maintenance thereafter. (Recipe here.)
Water supply
We’ve also installed a recycled IBC 1,000-litre tank for the water supply to the bathroom. The tank is sited about 7m or so above the bathroom, cut into the bedrock of the slope where it will eventually be buried (with built-in access) to keep the water fresh and prevent algae formation. The tank was used to transport sunflower oil. Lester jetwashed the residue away at a local car wash. Next stage is to run the supply pipes down to the bathroom and connect these to the plumbing for the wood-burning water heater, bath, shower and basin.

Other posts in this build …
Luise September 24, 2012
Gosh, Wendy, your “accidental” bathroom is turning into a masterpiece! So beautiful!!
Quinta do Vale September 24, 2012
Accidental bathroom! Love it! And thanks – though I don’t feel I can take much of the credit since there’s such a strong sense of the building building itself through us. It’s no exaggeration to say it feels a privilege to be having a hand in building it. I’m loving every minute of it.
Joaquim Conde October 8, 2012
Awesome project. A testament to the capabilities of the human spirit.
Truly inspirational.
I look forward to your next post.
Marta August 24, 2022
Hi Wendy, I’ve been following you on FB for many years. I seem to recall you were using worm humanure composting (I guess in addition to this method). Have you stopped using worms to compost humanure? If so, may I ask why?
Beautiful work in this project, like everything else at your Quinta. Love seeing your creativity come to fruition. Cheers!
Wendy Howard August 24, 2022 — Post author
Hi Marta. Thanks for the comment, but please note the date of this post – 2012! This was a year before we installed the first vermicomposting flush toilet here. Nearly a decade later and there are now 3 worm toilets onsite. They perform well and I’m very happy with them. But there are also 2 dry toilets as well. The Joe Jenkins method is still super useful to provide regular input to our compost heaps.