
The more projects we get into on the quinta, the more behind I get in documenting them. So much has happened here during the last 3 years that hasn’t made it onto this site yet, The more that gets done, the more the backlog builds up and the more daunting the task of documentation becomes … But enough is enough. I have to make a start somewhere.
I started writing this post on an unusually leisurely Sunday spent in the kitchen. In the spaces between bread, cake and lasagne-making, my attention fell on what a luxury this is now to be able to cook in a proper kitchen. What many would dismiss as merely ‘normal’ is, for someone who’s been cooking on a camping stove in a semi-derelict cave-like space for the last 22 months since the fires, an utter delight. So where better to start than the building of the communal kitchen in the main building? It was actually completed back in June, but we then went straight into 6 weeks of back-to-back courses and have been at full speed pretty much since.

This is how the kitchen looked when we first took on the quinta. Bedrock back wall and floor, dry stone schist back and side walls, open to the front. In winter, rainwater runoff comes through the bedrock.
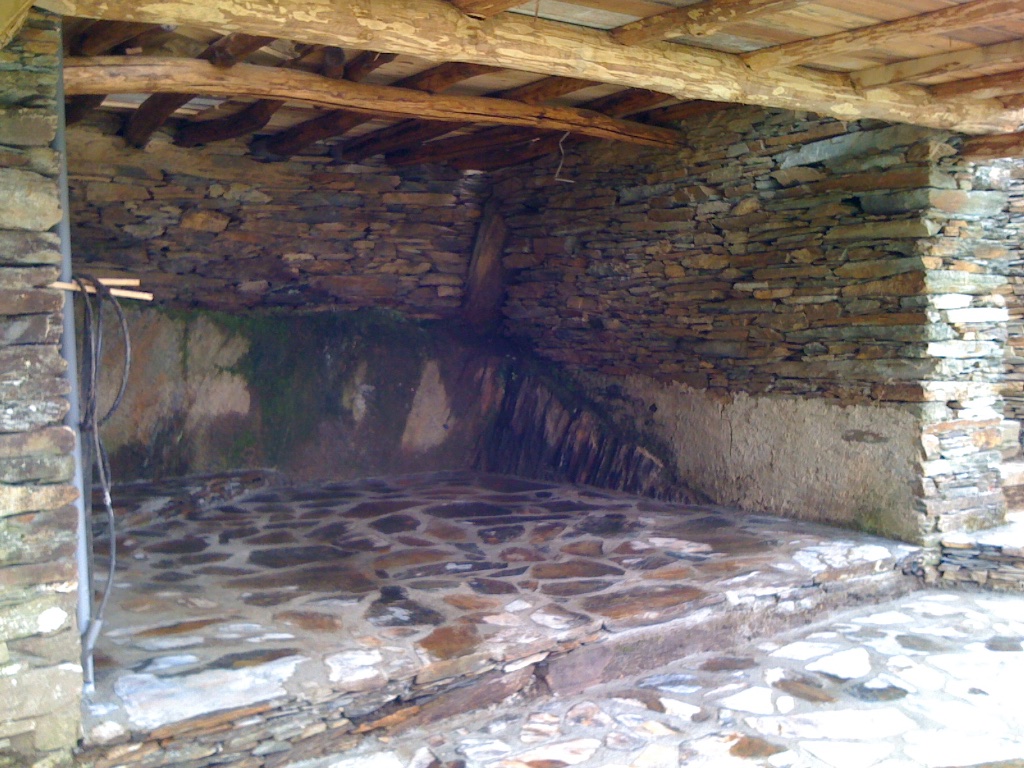
In 2011, a floor of schist slabs was installed. That’s pretty much how it remained until last Autumn, when George Christofis of Circle Permaculture came by and floated the idea of running a Permaculture Design Certificate course together in 2019. At first I thought it would be impossible with the state of the quinta being what it was after the fires, but there’s nothing like a deadline to get things moving.
And there’s nothing like good food to help a course run well, so the top priority had to be building the kitchen.
The most significant challenge by far was the lack of financial resources. I would have to build from materials I had onsite because the available budget was as close to zero as it gets. It helps that I’ve been a compulsive collector of ‘interesting junk’ found along the years in anticipation of recycling/upcycling projects, and that I hang onto left-over materials from other projects. It also helps that a lot of this was spared in the fires through being stored at the back of the main building. And as is the way of these things – the saying “necessity is the mother of invention” didn’t spring out of nowhere – the process was so much more creative, rewarding and pure fun as a result.
The main consideration to take into account in the build was the plan to build a rocket masonry stove on the floor above. A heavy duty supporting structure needed to be built directly underneath to transfer the weight to solid ground.
Work started in November 2018 preparing the ground for the masonry stove supporting structure, which was designed to look like a fireplace and would house the Rayburn wood stove. Protruding bedrock was cut back and a structure built from concrete blocks, rebar and cement. Not very ‘natural’, possibly – though that’s a debate for another post – but concrete has 20 times the compressive strength of lime. Sometimes it’s just the material for the job.


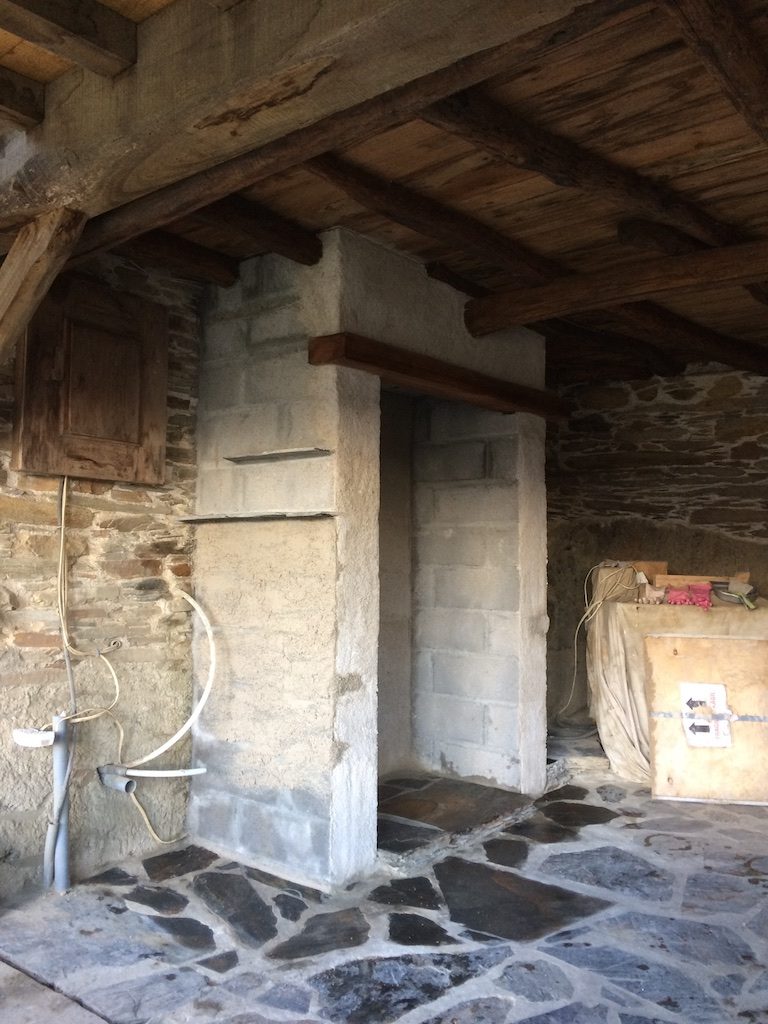


I used reinforced concrete beams (left-over lengths from another project) to pick up the weight of the main beam carrying the floor above and the joists either side of the structure. This had the added advantage of giving a lot more stability to the floor above.
The back wall of the fireplace had to be built out to square off the recess since the wall it’s built against is not square to the rest of the room. I did this with shuttering and a hydraulic lime mortar.
The oak beam used as a lintel was inherited with the quinta. The slate used to line the fireplace was left over from the roof. The tiles were from a job lot bought by a friend and surplus to requirements.
Once the fireplace was complete, we were able to move the Rayburn (acquired from local friends a few years back) into the space and then get on with the rest of the room.
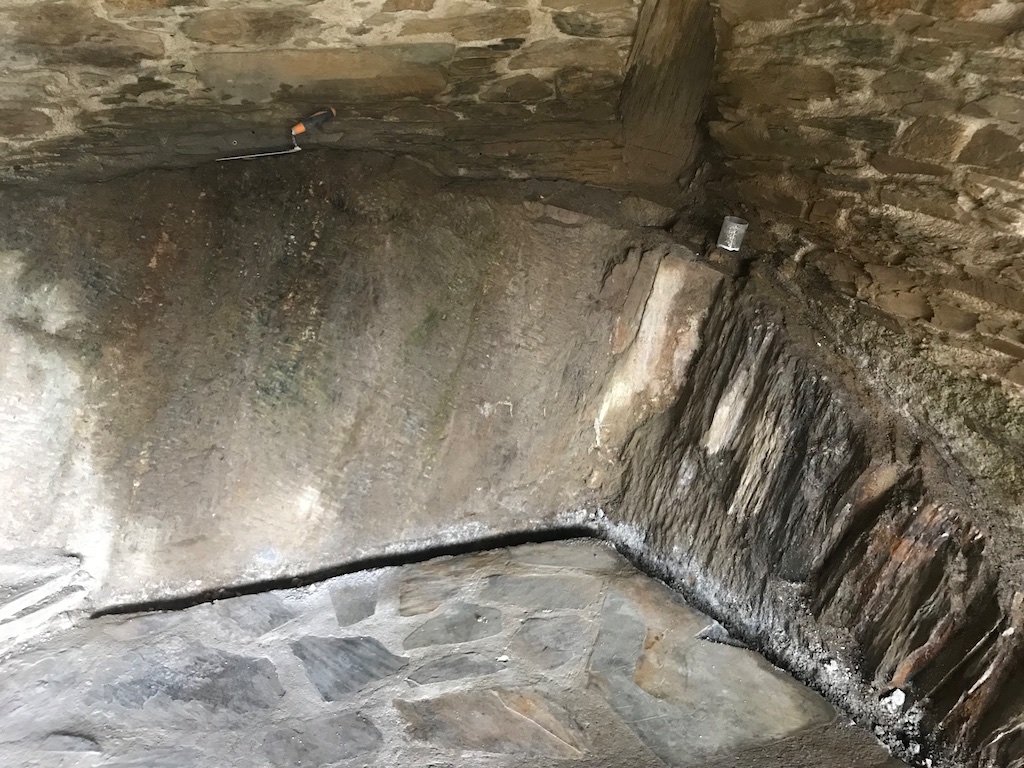
The Spring rains arrived just in time to point the way to the best solution to dealing with rainwater runoff coming into the room through the bedrock. The various measures used to keep the back of the building dry, while successful initially, are needing some remedial attention following building works on the roof.
After trying out some channels in the rock itself we finally cut a channel in the floor around the rock face at the back of the room and made a drain to join the kitchen sink waste before it leaves the building. Whether or not we succeed in keeping the rain out after repairs to the back roof drains are made, it seemed prudent to install a defined route for rainwater regardless.
Dry stone schist walls are a thing of beauty, but this was a dark cave of a room and it needed lightening up to function well as a kitchen. It also needed to be mouseproofed to the extent possible in an old rustic building.
We plastered in such a way as to leave the unevenness of the rough stonework evident and the odd face showing through. The fireplace was plastered to imitate the stonework. We used a 2:1 mix of fine sand and hydrated lime (cal hidratada).


Next came the completion of the floor in what was to have been the greywater processing greenhouse part of the kitchen. This was a nice idea at the time, but the main problem with it was that with 4 doors to the outside and the necessity to have inward opening space for 2 and pathways to all 4, in practice there was virtually no space left for growing. So now it is just open space. And like the blank space in a painting or the silences within the music, it adds a dimension to the room I didn’t foresee. It gives it room to breathe.
The greywater instead goes to mulch pits behind citrus trees. They are loving it.


The basic framework and counters for the principal part of the kitchen units had been made by a carpenter friend before he left the area, back before we started work on the room itself. I had found the old sink – a 120kg single slab of slate – in Coimbra and the framework was designed around it.
The counters were made from 6cm slabs of sweet chestnut which had been sitting in a woodshed in the village above the quinta for the best part of 40 years. Left-over slate from the roof was inset into them to take hot pans and dishes.
Whilst the wood was utterly beautiful, it was also badly warped and becoming very dry and porous in places. When we put the framework together, the counter was only touching the rails on one corner and you could fit a fist under the other side. It was verging on the unusable. There was a lot of discussion about whether it was easier just to start again.
Long-term volunteer (and carpenter) Tom went away to the UK at this point for work and I built out the main unit and constructed the remainder of the kitchen while he was away.
The corner post is a piece of ivy. I cut it from a friend’s chestnut tree to save the tree during a workday on her quinta. I was so intrigued with it I asked if I could take it home. It was a slow and fiddly job to debark, but it’s been sitting in my yurt for a few years now drying out nicely and waiting for this moment.
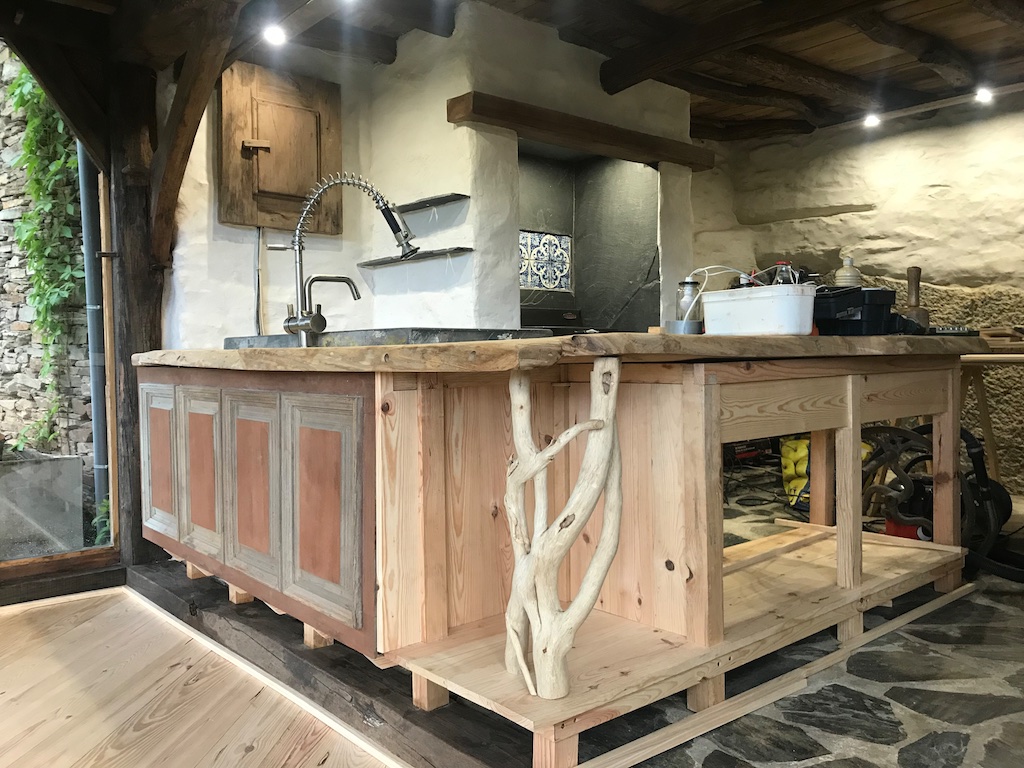
The front of the main unit was made from an old mahogany door I found at a scrapyard several years ago. Cupboard doors were made from the door propped up against the right hand wall in the picture (above) of the original state of the room. It seemed appropriate that it should find its way back into the room somehow.
But through all this happy upcycling, the lack of resources was making it obvious there wasn’t really a choice as far as the countertop was concerned.

I did a lot of online research on straightening out warped timber. Anything was worth a try. When Tom returned, we soaked the countertop with water, wrapped it in wet cloths, laid it face down on a flat surface and weighted it down with 50-litre buckets of water for a few days, letting the sun get at the convex surface of the underside.
This brought the biggest gap down to half a fist’s distance from the rails but more importantly, we discovered we could get the wood to flex enough to clamp down onto the rails. So we applied some heavy duty sash clamps, tightening them progressively each day while the wood slowly dried. After ten days or so we were able to screw the counter down. There was some slight cracking but after many many coats of linseed oil and ongoing applications of a beeswax, linseed oil and turpentine finishing wax, these have closed up again. Two months on, the counter is finally starting to acquire a lush patina and water resistance is improving with every coat of wax.
Yes. It takes time. But it’s worth it.
The problem of where to store foodstuffs was solved by using a stack of old English apple crates which I’d bought several years back for use in the store room.
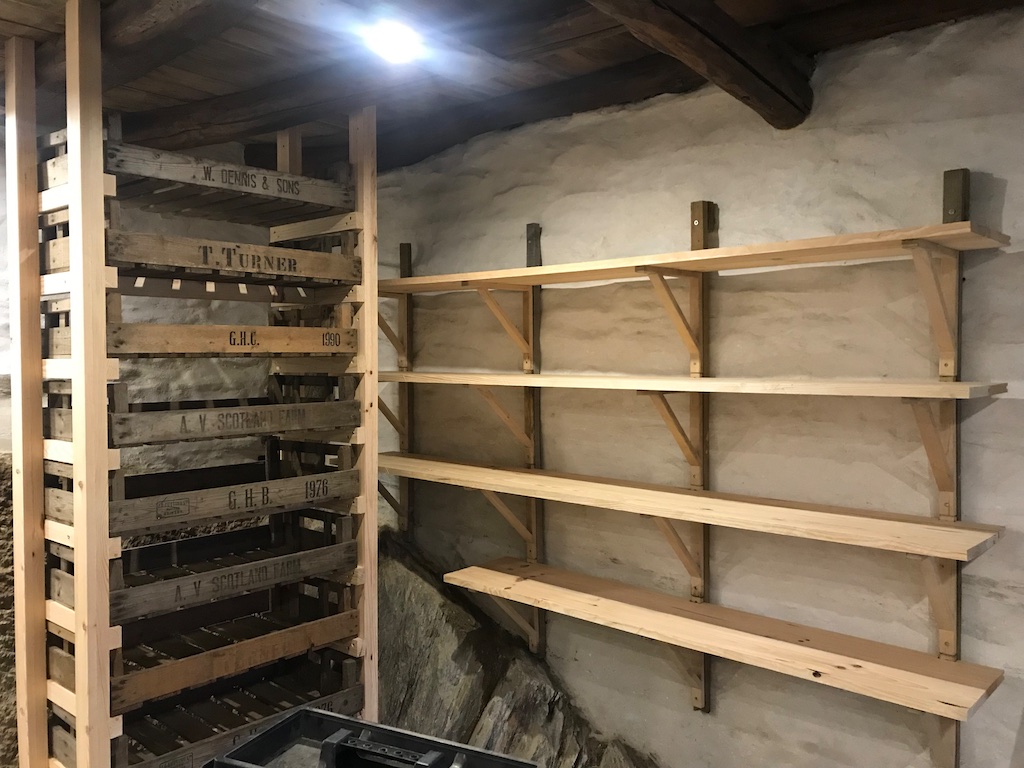
Wall shelving was made from the tongue-and-groove flooring which was a donation from the Benfeita Fire Fund (also used for building out the units and the floor) along with some wooden shelf brackets. These I’d had left over from a project back in Scotland and decided to bring with me 10 years ago on the principal that you never know when you might need them … Strangely (or not), there were exactly the right number.
The plate rack over the sink was a fun project for a Sunday. 4 IKEA trivets and some left-over roof battening.

Serendipity played a major part.
After repeatedly trying, unsuccessfully, to chase down second-hand gas stoves on OLX (Portugal’s equivalent of ebay) and with just days to go before the first course started, I had to order a new one. Delays to delivery were threatened. We somehow managed to arrange a last minute drop at the garage where the car was being repaired 25km away.
I discovered the stools being offered through a chance conversation with a friend and we somehow sandwiched all seven into a VW Polo, though I had to wear one for the journey home.
A chance visit to a local market the day before yielded the hanging rack for the kitchen utensils and frying pans.
Those who arrived at the quinta a day later never guessed how quite literally last minute everything came together!
For the next 3 weeks the kitchen was catering for 17-20 people on a daily basis. I’m pleased to say it passed the test. There are improvements, of course, some of which have now been made – a blackboard (part of a plywood packing case framed with tongue-and-groove offcuts), shelves for spices (pieces of mahogany shelving inherited with the quinta) – and a bit more counter to be constructed around the gas stove, but this feels like a massive step forward in the quinta’s evolution.
And it’s recovered my joy in cooking which has very definitely been missing the last 2 years.
This post wouldn’t be complete without massive thanks to everyone involved – the succession of amazing friends and volunteers who helped in the construction and fitting out; the local builders merchant for their generous and understanding approach to fire victims; the Benfeita Fire Fund for some of the materials; MAAVIM and their donors for the fridge, saucepans, plates, cutlery, glassware and various other kitchen equipment, the Benfeita Tool Bank and everyone who donated to it for the loan of a table saw and mitre saw; those who lent or donated funds to get us to the finish; and lastly those who put the kitchen through its paces in the first few weeks of operation, volunteers and course participants both. All of you have made this room what it now is – the warm heart of the quinta.


Victoria Elizabeth East December 3, 2020
What a beautiful kitchen, kudos to you for sticking with it and reusing so many beautiful wooden pieces. I love the silverware holders, and the sink.