
SPOILER … This experiment didn’t work! See the Comments section.
With summer temperatures looming, so have thoughts about refrigeration. We don’t have any sort of fridge. For most of the year – autumn, winter and spring – this is much less of a problem than it might at first appear. Most dairy products last well enough at yurt temperature that they’re eaten before they go off. Milk that does turn can be turned into cheese and when we occasionally buy meat it’s eaten right away. But summer? Well that’s a different matter.
It’s the noise factor every bit as much as environmental considerations which has stopped me pursuing any electrical solution (though we did have a brief flirtation with an on-offer-in-Lidl 12V camping fridge last year which was so inefficient it was a relief when it packed in completely after just 2 weeks). The thought of sharing a yurt with a humming fridge is just … no. And it’s not like humanity hasn’t lived quite happily for millennia without them.
I started looking at low tech solutions based on cooling by evaporation like Zeer pots. At which point I wondered how I could ever have so much as considered an electrical fridge in the first place.
But suitable earthenware pots of a sufficient size are not particularly cheap, even if less than an electrical fridge, and I wanted to experiment with ideas that could be adapted to be built into a kitchen when we eventually get to the point of fitting one out. But how to replicate a Zeer pot in a box shape?
Portuguese clay building bricks or tijolos! (These are quite different to building bricks we’re used to in the UK. They’re too fragile – and are not designed – to be load-bearing.) They’re cheap as chips. And they even come with cells ready made to fill with the sand.

So the experiment begins …

In anticipation of the amount of clay-based insulation, plastering, earthen floors and cob construction we’ll be doing, I took a delivery of clay from the local brick factory back at the beginning of May. The track was impassable at the time thanks to a combination of forestry operations and rain, so after a quick phone call to the presidente, the quarry truck left its 12m3/17-tonne load at the lixo, the rubbish tip/materials storage area belonging to the local freguesia (council). We’re still waiting for our local man-of-many-machines to bring it along to us with his tractor and trailer, but it’s been ploughing time …
But I didn’t need much more than a couple of large buckets for this project.

Breaking up the dry clods of clay for soaking.

Soaked clay and clay slip being added to sand. This is in the ratio of just under half a bucket of clay to one bucket of sand, giving a rough 30% clay/70% sand mix

After mixing the clay and sand together well, I added a bucketful of horse hair for fibre. This came from a local Shetland pony’s spring moult. Thanks Gypsy!
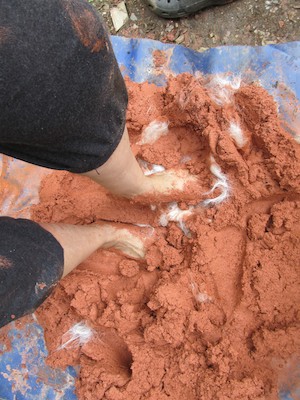

Treading the mix well to incorporate the hair in standard cob-mixing style.

The mix after being well trod for about half an hour. At this stage, turning it onto itself by pulling over a corner of the plastic sheet results in a nice clean sheet with none of the mix sticking to it.
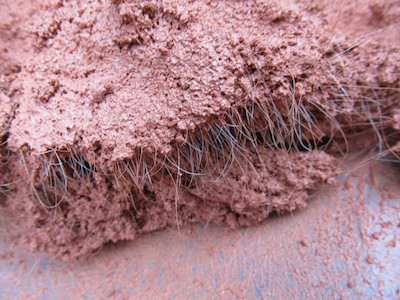
A close-up shows the horse hair is evenly incorporated.
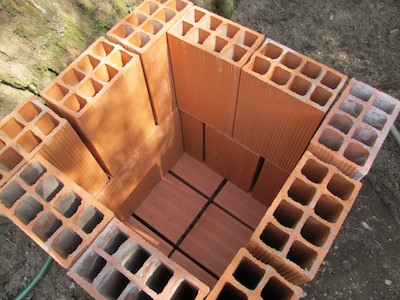
Dry-stacking the tijolos to work out the dimensions. Tijolos come in many shapes and sizes. These are 30x20x11s.

Plastering the base after leveling the tijolos.

First course in place.

Lining the interior with a layer of clay plaster.

Sand added to the inner cells. I’m going to see how well this works first. Water was poured into the cells to wet the sand and slow down the drying of the plaster and the whole thing was covered in plastic. It was going to be a few days before I had time to do the next layer.
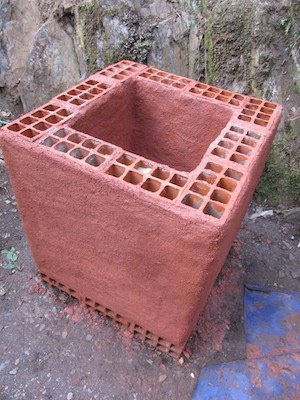
Second layer on and plastered inside and out. The tijolos are staggered to form a stronger structure. This means the cells don’t match up exactly all the way through from top to bottom, but they overlap well enough to work.

Sand added to the top layer.
Now it remains to let the plaster dry (slowly, to minimise cracking) and then test it out. If it works well enough, then I have an idea involving some dripline irrigation pipe for keeping the sand moist …
Jane Greig June 21, 2012
Wendy, this is great! Such a lot of thought. Such a lot of work. And clearly you remain passionate. Lovely to see.
pan June 21, 2012
ingenious; clever stuff
Quinta do Vale June 21, 2012
Work? Nah … this is unremittingly hopeless FUN. And just a warm-up exercise for the really serious fun of making buildings out of much the same sort of clay/sand/fibre (= cob) mix. It’s just a big kid’s mud pie really … and I have enough clay for a 55-tonne mud pie :twisted:
Ingenious? Only if it actually works …
Elaine June 21, 2012
Great job. It reminded me that there was a small pit in the grassy area in front of Garden Cottage (many years ago) that we used to use as a fridge when we came on holiday. It had obviously been the original store for food items many years previously and we discovered it by accident whilst cutting back the grass to mke a drying green.
Looks like you are never short of projects!
Quinta do Vale June 21, 2012
There were all manner of ingenious cold stores before electric fridges it seems. A friend here was reminding me of the old meat safes that had plaster-of-paris lids made with a depression in the plaster that was filled with water. Much the same sort of idea. What was the one at Garden Cottage like? Just a pit in the ground?
Luise June 22, 2012
Great idea! Will you fill the inside with water or is the wet sand sufficient to keep it cool? And did you ever try cooling you things in your stream or is it impractically far from the yurt?
I also like the David Holmgren’s idea of a fridge/chimney thing in the house (wouldn’t work in a yurt) where cold air from a cave space under the house gets sucked up through a chimney that stores the items-to-be-refrigerated.
Also, have you ever heard of ice houses in Portugal? We don’t have a freezer here as ours broke and we didn’t see the need for one, but I like to make ice-cream occasionally, so I was wondering how to build an ice house in such a hot climate. I guess a north-facing cave in bed-rock might work. Now I only need to find a property that has that and all the other things I’m looking for…. :D
Quinta do Vale June 22, 2012
Yes I like David Holmgren’s idea too and it’s something I’ll be doing in the kitchen – which is in the north corner of the room and cut into bedrock – but I wanted to add evaporative cooling as well.
The Zeer pot model uses wet sand. The cells aren’t sealed, so they won’t hold water alone. I’m trying it first with only the inner cells filled with sand, but it may be (and very likely will be) the case that there isn’t enough air movement through the outer cells to create enough evaporation to effectively cool the inside of the fridge. And I don’t know whether the 15mm or so thickness of the plaster that holds the whole thing together will allow enough evaporation either. It’s all a big experiment at this stage.
We do use the stream water for cooling, and also the niche behind the waterfall near the yurt, but frankly it’s a pain having to take a cold shower every time you want a slice of cheese and I haven’t found a suitable container to keep in the water (other than sealed bottles) that stops insects, silt, water and weed getting in with the food. The water even manages to get into those plastic cool boxes!
Ice houses … well for them you need a winter that’s cold enough for long enough to create enough ice to last until summer. We don’t have those kind of winters here. Rock caves are cool places and the water that comes out of the mountain is always cold, but not cold enough for ice.
Luise June 24, 2012
I guess I’ll have to ask my in-laws in New England to send me a ship-load of ice then – like in the old days. Not. ;) I know it frosts a little around where my friends live (Sandomil – check out the monthly Mercato Aberto, by the way!) and I was hoping to be able to just go up a nearby mountain and make some ice-blocks there, but the frost might not be sustained enough to allow for big blocks of ice. Until the gulf stream dies. Oh well…. I can live without a freezer and I’ve been wanting to dry more food anyway….
Quinta do Vale June 25, 2012
Well you might be lucky in some winters and be able to get ice from the summit of Torre, but there was no snow even up there last winter except very briefly. I’m planning to have a freezer, but not a fridge (provided I can get the fridge idea working properly … so far there’s no cooling effect so going to try it with the outer cells filled with sand as well next).
I’ve heard of the market at Sandomil, though it’s a bit beyond our usual market radius. There are 2 a month more locally, and of course the usual weekly markets in nearby towns.
Luise June 28, 2012
I’ll see how the whole no-freezer idea will continue. :)
I hope you get your little fridge box working. I read in Ben Law’s The Woodland Way last night that he uses a box similar to yours, but the sides (or the box itself? He wasn’t so clear on that.) filled with charcoal which he says is working well. He also writes he has to re-moisten it about twice a day though.
So good luck, I’m curious how it will turn out!
Quinta do Vale June 28, 2012
Yes Zeer pots need to be moistened twice a day too. I was figuring on a cunning plan involving drip line irrigation tubing and a water reservoir if I can get the basic idea functioning.
Yesterday I filled the outer cells with sand and watered the lot, stuck the lid on, and this morning it was warmer in there than outside!! I think it’s possible the small amount of thermal mass of plaster on the outside could be absorbing and holding the heat of the sun and the clay cell divisions between the internal and external surfaces of the tijolos could be acting as thermal bridges (always a concern). Next stage will be to remove the plaster on the outside (hoping the whole thing holds together OK …) and see what that does. Fortunately the plaster is clay so can be reused in the cob toilet we’re working on right now.
helen June 28, 2012
We’ve been using the two terracotta pots with sand for a while and it works well(though we don’t keep meat in it.) It does create a damp cool though so I keep things wrapped and not everything likes this. I found that it was too damp for soft cheeses, they went mouldy quickly but a Galician friend has just told me her mother keeps them wrapped in muslin or cotton and changes it when it becomes damp. You fridge looks great and a much more practical size and shape.
Quinta do Vale June 28, 2012
Helen!! How are you guys getting on? How’s Pepe? Yes I’ve been using a single terracotta Dutch oven type pot which I soak in water for about half an hour every so often (though often not often enough). I agree about the damp cool and the soft cheeses. I’m rapidly coming to the conclusion the tijolos aren’t going to work because of this thermal bridging between the cells. I suspect the inner and outer pots need to be completely separated by the damp sand, so am thinking up ways to achieve that at the moment.
Michael March 18, 2015
Came across your page and liked your idea.
The reason it didn’t work is simple though.
Your construction doesn’t allow direct evaporation to the outside.
You could break/cut the bricks so that only one chamber remains. Anyway it is important for the water to be in direct contact with the air (which happens through the pores) at an open shadowy place with good air circulation. The sand is only there to prolong the water quantity time-wise. You could take wool or even light soil or cotton. If there is no water in great quantity in contact with the air, there is no energy transportation. The thinner the system, the greater the effect. The only other important thing is that there cant be any gap between the space that gets cooler and the system itself. You could for example copy the system in a totally different way.
You can take a big plastic container (single layer walled) and create a mantle of small wire mesh around it which you then fill with watered sand. Make a frame to stabilise the mesh. Shadowy airy place. Et voila.
If the plastic variant of the inner container is not taken, moisture can be helped by creating shelves, putting cotton towels on them and storing the groceries on a grill frame or such. Alternatively, 1 kilo of coarse sea salt placed on a plate on the inside to absorb the moisture. Swap the plate every 2 days and put at air to dry and almost infinitely reuse.
Almost everything can be done by the small man with a big motivation.
Quinta do Vale March 18, 2015
Hi Michael. Thanks for the comments. Yes – I discovered all this subsequently (as noted in the comments above). I’ve been using 2 earthenware pots with sand in between for the last 2-3 years and now have some electrical refrigeration capacity (see this post).
The long-term background thinking behind this brick experiment was to add evaporative cooling to a cupboard-style ‘fridge’ in one of the buildings. This would be cooled mainly by a piped airflow drawn into the building underground and exited at the top, but aided by evaporation through the walls. However I don’t think this would work particularly well because there just isn’t enough airflow in internal spaces to create any significant cooling effect for most of the time and having a greater flow of air inside the cupboard would more than likely have it working in reverse! I still intend to build a cool cupboard like this in the main kitchen, but if I do add evaporative cooling, it’ll be by some other means like directing the internal airflow through a double-skinned pipe (with evaporation to the inside). I have my doubts about that though because loading a convection aircurrent with moisture would probably stall it. Have you got any better ideas …? :-)
(PS. If your email address hasn’t been registered to a comment on this blog before, your comment won’t be published until I approve it.)
florent November 8, 2020
Hi ! Cool experiment! Did you had any luck removing the plaster inside and outside? Does the systeme works this way?
Thanks for sharing your ideas.
Quinta do Vale November 14, 2020 — Post author
Hi Florent. The plaster was simple enough to remove.I just wet it down again. But I moved on to using 2 earthenware pots (a zeer pot) instead rather than continuing with this particular experiment. And then eventually to repurposing a chest freezer to run as a fridge. See this post.
Betty Hay July 24, 2022
Try keeping the whole thing in the shade the direct sun way offsets the evorapation!!
Wendy Howard August 18, 2022 — Post author
This was an experiment back in 2012! The area is in the shade – it just gets a small amount of sun mid-morning for half an hour or so. So that made no difference!