
When I first started planning the infrastructure here, I intended throughout to use Joe Jenkins‘ dry composting toilet system. Beautifully simple and easy to construct and maintain, convenient and portable, no requirement to separate urine from fæces, and an efficient composting system designed for optimum thermophilic decomposition. It’s no wonder Jenkins’ toilets have been dubbed ‘Loveable Loos’. What’s not to like?
Many people though are surprisingly squeamish about dry toilets. When I came across Anna Edey’s experiments with vermicomposting in Massachusetts 18 years ago for processing sewerage out of a conventional flush toilet, described on the website promoting her book, I was intrigued. The fact that it coincided with us beginning renovations on an outhouse toilet for the wee house (designed to be guest accommodation) seemed fortuitous. The outhouse was ideally situated for it and putting in a composting flush toilet for the guest accommodation seemed like an excellent idea. When we then discovered a nice old ceramic flush toilet bowl still in one piece at the local dump, it seemed to be signalling the perfect opportunity to give this method a try. Edey’s website didn’t give full details, but there was enough information for me to work the rest out for myself.
While some would argue that any flush toilet is an unnecessary use of fresh water, this side of the quinta badly needs water in summer and the series of green filters Edey uses to process the liquid component of the flushings will help green up this area. Also this land is pretty short on worms – it gets too dry in summer for them to survive – and compost including worm castings is demonstrably more nutritious than compost without castings, so by installing both Jenkins’ and Edey’s systems, I hope to get the best of both as well as to be able to experiment with and demonstrate the use of two sewerage processing systems that improve, rather than pollute the environment.
This is how it works. The toilet flushings drain through a normal waste pipe into an insulated plastic container which contains a large quantity of worms who inhabit the surface layers of a large quantity of carbon-rich organic filter material (wood shavings, partially composted leaf litter, etc). The container is insulated to prevent the worms either freezing or cooking. When the flushings enter the container, the solids remain in the container to be processed by the worms and the liquids drain through the filter material and exit the container in another waste pipe to be carried to a bed (or series of beds) where they are taken up by growing plants or processed by soil bacteria.
So this is how we built it …

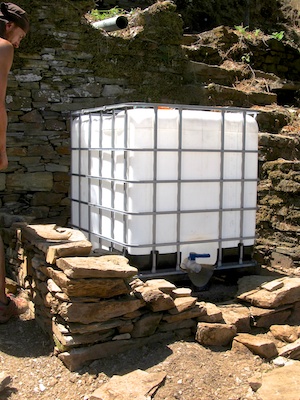
Another 1,000-litre plastic IBC tank forms the basis of our worm composting toilet system. We first made an access hatch by cutting half of the top off. It slots back in place very neatly – you can only just make out the cut in this photograph – held in place by the screw-top lid to the central opening (through which the waste pipe empties into the tank) and supported by an aluminium bar which clips onto the rest of the frame each side

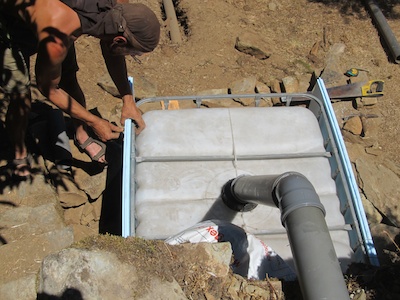
Having put the tank in place, we then connected 110mm plastic waste pipe to the outlet and dug it into a trench leading to where the first of the green filters would be dug
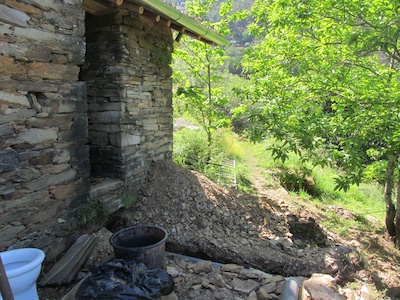
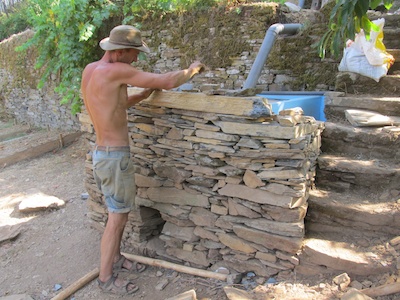
The tank is sited immediately below the toilet. We decided to use schist to make an insulated container for it, rather than sawn timber. It’s longer lasting, we had lots of schist on hand for free, it would blend into its environment much better in stone and Martin reckoned he could build a dry-stone walled container in about the same time as it would take to make one out of wood.

The tank with the toilet waste pipe connected
As the walls were built, insulation was added to keep the worms within optimum temperature range, 13-27°C both winter and summer. Closest to the tank, we used sheets of polystyrene insulation, and filled the gap between insulation and stone wall with Leca (lightweight expanded clay aggregate)
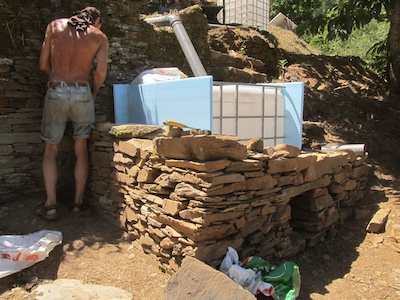
The dry-stone walls grow

Access to the pipework draining the tank will be possible if necessary
A large stone slab on the front wall of the container makes it easier to access and empty the tank

Container complete, slate wall covering in place, and wooden framework ready for the galvanised corrugated roof. We opted for this roof covering because it makes a lightweight roof easily moved to gain access to the tank. More insulation will be fixed to the underside of the roof and the top of the tank
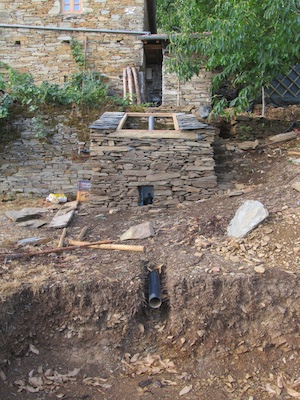
Toilet, tank and pipework into the green filter bed, dug ready for filling and laying of pipework

The first green filter bed
Once we’ve got water piped and stored on this side of the quinta to allow for flushing, the tank will be half-filled with wood shavings and partially-composted leaves, bracken, etc, and then horse manure containing lots of worms – Eisenia fetida or tiger worms commonly found wherever piles of manure have been left to age for a while. The horse manure, besides being a good source of the worms, also provides the starter material for the worms to get working on.
The first green filter, about 1.5m³ in volume, will also contain a lot of organic matter – wood shavings, leaf mould, dead bracken, compost – to act as an organic sponge and carbon reserve which, when mixed with soil, will soak up and hold the liquids for the plants that will be grown in the bed and balance out the high nitrogen content of the urine-rich water. Rather than an open pipe at one end of the bed, the liquid will flow through a number of smaller perforated pipes to distribute it more evenly. With the comparatively small volume of liquid likely to be generated by the toilet (grey water goes elsewhere), I am thinking at the moment that this one bed will likely be sufficient to deal with it, but will build in the option to create a further filter bed if it appears necessary. There is no possibility of contamination of groundwater or neighbouring properties, so we have flexibility to experiment.
UPDATE: June 2014 The toilet is now working. See the next post about it here.
UPDATE: November 2016 The toilet has been working for 2 years now. It’s generated a lot of interest. My local municipality are now planning to install vermicomposting units based on this system in local villages. The first was commissioned in July 2016. You can now legally use this method of sewage processing in this region. I have also created a new website with full details of the system, it’s design, construction, maintenance, and more besides, including a forum. The aim is for the site to become a repository of community-sourced experience with installing and operating this system.
Laurence December 15, 2013
I am moving to Penafiel in a house on the river. Looking for an alternative toilet system for the garden bangalow. How is your toilet system working out?
Thanks
Laurence
Quinta do Vale December 15, 2013
Hi Laurence. I’m still waiting to ‘commission’ the toilet. Because it’s a flush toilet, we can’t start operating it until we have water supplied to this side of the quinta. We’ve been building water storage and supply infrastructure for the quinta since May. Almost there, but guessing it’ll be another month yet before it’s all ready.
Since posting, the IBC tank now has substantial layers of pine woodshavings (bottom), dead bracken (middle) and leaves (top) which together occupy about 50% of the volume of the tank. This will settle down considerably once the tank’s in use.
The green filter bed below the tank which will receive most of the liquid waste has similarly been filled with a large carbon reserve/organic sponge. It contains around a third of a tonne of chestnut wood shavings and offcuts (a by-product of the building of the timber-frame grey water-processing greenhouse being constructed at the main building) which is laid in the base of the bed and is just waiting for me to lay a network of perforated pipes through it before backfilling with a bit more organic material and topsoil, then planting.
I’ll make a new post about this with pictures once we’ve completed this stage (and once I’ve got a new camera since mine has just packed up), and there’ll be subsequent posts once we start to use the toilet.
If you’re on the river, I would use more green filter beds than I’ve used here to be on the safe side. Anna Edey’s site (linked in the post above) has some details about a system she did for a restaurant right on a river and also has the test results from it. Though having seen the amount of raw sewerage finding its way into the average Portuguese river, you could hardly do any worse than use the currently ‘approved’ systems …
Emil Dahl May 1, 2015
Hey guys! Thanks for a good informative site! We’re living in the Serra da Estrela and we’re just about to build a composting toilet. Have been thinking about a flush toilet as well and this system looks good! I have “2” questions: The green filter bed is not a reed bed? It’ll be filled with soil? – And what plants are you planning to put in?
Also I’m wondering how you will empty the ICB once “full” – if it ever gets full. Wont the contents be too solid to come out the tap at the bottom? I was working as a volunteer at BOOM festival and they were using ICBs filled with “EM” and sometimes worms (if getting stinky). These toilets (no flush though) could take thousands of people 24/7 without ever getting emptied – breaking down so quickly and coming out the other end as black juice, completely clean and odor free straight from the toilet. Perfect fertilizer.
Keep up the good work!
E
Quinta do Vale May 1, 2015
Hey Emil! Glad the site is helpful. No. The ‘greenfilter’ bed isn’t a reed bed. Two main reasons. One, it’s not necessary because the water is already pretty clean by the time it comes through the ‘brownfilter’ and two, there’s not enough water coming through the system to support a reed bed. This system is blackwater only (plus the wash-hand basin in the toilet). Greywater from kitchen and bathroom go elsewhere. You can grow pretty much anything in the bed. I grow a lemon tree and other plants that like high nitrogen levels, but any kind of tree, shrub or even cereal like winter rye that likes a moist soil will grow in these beds, even if you’re also putting your greywater through the system. The ‘greenfilter’ (as detailed in the next blog post about this system) is filled with the same slow-release carbon reserve/organic sponge as the ‘brownfilter’ IBC tank. It contains around a third of a tonne of chestnut wood shavings and offcuts (a by-product of the building of the timber-frame grey water-processing greenhouse being constructed at the main building), leaves and dead bracken which is laid in the base of the bed. Perforated pipes are laid on top, covered with a bit more shavings, etc, then compost and soil plus plants.
Emptying the tank is also quite simple. Half of the top of the tank comes off for access/cleaning. We will simply stop using the toilet for a few days, then encourage the worms into one corner with some nice juicy kitchen scraps. After a day or so we can remove the worms and the top layer of unfinished compost into a separate temporary container, take out the bulk of the finished compost, add fresh shavings/leaves/bracken/etc, replace the unfinished compost and worms, and start using the system again.
Good to hear about the BOOM system!
John Middleton March 20, 2021
Hi, what size mesh is used in the bottom of the Ibc tank, please?
Any comments/ links to something suitable would be much appreciated.
Thank you
Quinta do Vale April 5, 2021 — Post author
Hi John. Please see the site dedicated to these toilets, as there are some subsequent updates and improvements you should know about if you plan to install one of these.
Alta May 25, 2025
Good morning. I am quite intrigued by this idea. Does the effluent going into the green filter bed ever get tested for e-coli load? (One of the reasons french drain systems is now prohibited in my country, is because of the contamination of ground water with high e-coli loads.)
Wendy Howard July 6, 2025 — Post author
You would have to ask each individual installing this system whether they test their greenfilter water or not. The original work done by Anna Edey (who designed the system this derivative is based on) showed no detectable levels. I’m puzzled as to why French drain systems should be banned since they’re simply mechanisms for diverting rainwater around or away from structures where water ingress isn’t desirable and have nothing to do with black water treatment? Most groundwater faecal bacterial pollution comes from old septic tank systems or farm manure pile runoff.