
Ach! Where does the time go? I’m so hopelessly behind with blog posts and there are now so many pending I scarcely know where to start. I just checked the last post I made about the outdoor kitchen for the wee house and it was a year ago!
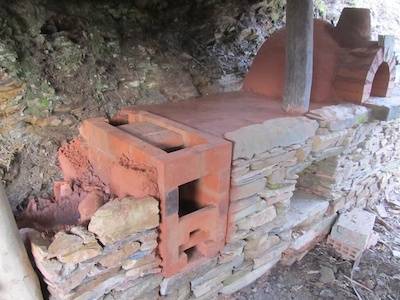
Alongside the cob bread/pizza oven I built last spring (and which is now producing fabulous food), I also constructed a wood-burning masonry cookstove. I found an open source Sketchup model online and adapted it for Portuguese fire brick dimensions.

This is the adapted model. Click on the image to download the Sketchup file and open in Sketchup (3D modelling software which is free to download). Firebricks are colour-coded for different lengths. You’ll need to be reasonably proficient with an angle grinder (at the least) to build this stove.
Here is how the stove was built …
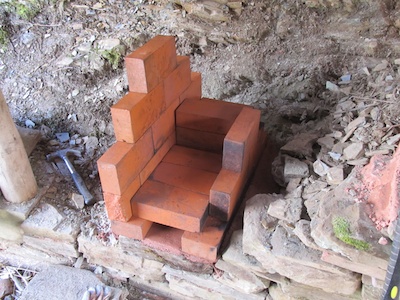
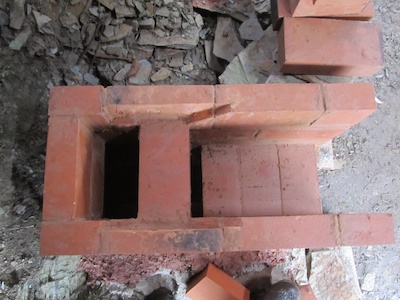
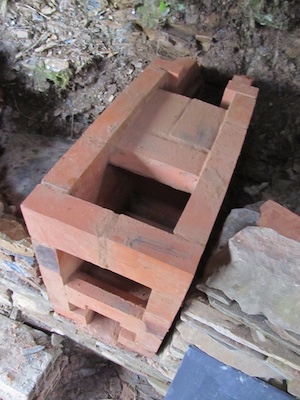
The firebricks were mortared with a thin layer of fireclay and fine sand. As with the cob oven, I set the firebrick base into a clay/sand mortar on a bed of levelled sand. Since there is an air channel running beneath the firebox of this stove into the back of the firebox and on into the chimney, there’s no need to insulate beneath the base of the stove.
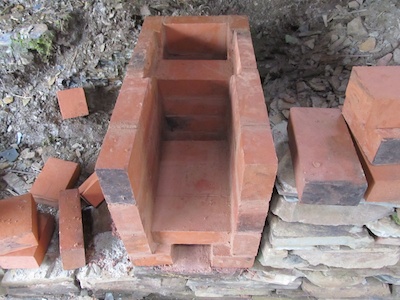
I particularly like the design of this stove for the way it channels the combustion gases from the firebox forwards and up, then forces them into a laminar flow beneath the cooking surface back towards the chimney. This makes for a nice gradation of temperature from a good fast boil over the firebox to a rolling simmer at the back.
Some of the cuts in the firebrick were a bit tricky to do freehand, but inaccuracies were compensated for with the fireclay mortar when the stove was put together. A jig would improve matters no end. Or a chopsaw …
To keep the fire efficient, a mix of sawdust and clay slip was used (just as in the cob oven) for insulation on either side.

On the left side of the stove, I left a gap in the insulation so heat can transfer through a clay/sand mix into a circular chamber created in the work surface. This will be used as an insulated ‘hay box’ for slow-cooking soups and stews and will save on firewood for long cooking times. It can also be used for dishes brought to the boil on a solar cooker in summer.

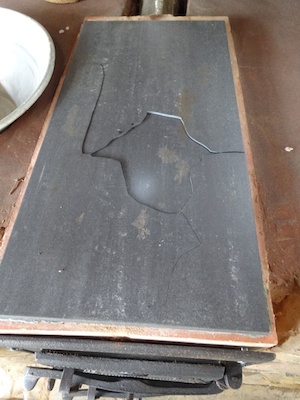
I started off with a ceramic tile for a cook top. I was given a couple of floor tile seconds by one of the local builders merchants. I figured that the firing temperatures of these tiles meant they ought to withstand the cooking temperatures of a wood fire and it was worth a try since they didn’t cost anything.
What I’d failed to think about, of course, is the low thermal conductivity of clay and sand. This means that the heat from the fire is slow to spread through the rest of the tile, particularly the edges resting on the firebrick, and the stresses set up in the tile from the extreme temperature variations are too much for it to stay in one piece. The first tile broke in short order. The second one I tried using a thick bead of high temperature silicone to support just the very edges of the tile and allow combustion gases to get into the gap between the tile and the firebricks. It wasn’t enough. This was the result.
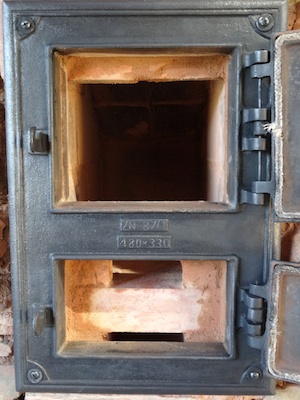
I found the cast iron doors for the stove on eBay. They were almost exactly the right size. Some further work with the angle grinder was needed to get them to fit, particularly to the bricks across the top front of the stove, so for added stability we drilled into these and used lengths of rebar as ‘dowels’ to hold them together.
I later discovered that the fire doors are widely available in Poland, where they’re manufactured.

Finally, the completed cooking area of the wee house outdoor kitchen! A 100mm stainless steel flue pipe takes the flue gases from the stove out behind the roof.

And the stove in use. I’m very pleased with its performance: it draws well, comes up to temperature rapidly, keeps a good steady heat and cooks well.

Frank Antonson September 27, 2014
You do SUCH good work! Thanks for the detailed step-by-step sharing.
Frank
Indi January 27, 2015
This looks excellent! Thanks for the ideas : )
Song Weaver April 30, 2015
WOW! This is GORGEOUS!!!! Great Work!
Lonzo April 8, 2016
Where di you get your current cooktop? Did you make it out of tile as well or did you fins a cast iron cooktop from an old stove? Great work by the way!!!!
Quinta do Vale April 8, 2016 — Post author
Thanks. The tiles didn’t work. The cook top is cast iron. I found it online and was able to get the right size for the stove.
Marilyn December 28, 2021
Wow. Thank you. Do you think this could be built inside a house?
Quinta do Vale January 4, 2022 — Post author
Yes. There’s no reason why not. You would just need to be extra careful to make sure there are no leaks of exhaust gases around the flue, that it’s well insulated from its surroundings and that there’s no combustible material within close proximity.
Fajdar October 5, 2022
hi. How to connect exhauust pipe to the stove, Is the pipe lowered to the air duct below or is it level with the top of stove?
thanks
Wendy Howard November 17, 2022 — Post author
You connect the flue via a right angled section to the back of the stove where there’s an exit for the gases as in this image and level with the top of the stove.
