
A year or so ago I salvaged a couple of tin cans from the local dump. From the moment I laid eyes on them they were shouting “portable rocket stove!”. They’ve sat around waiting for me to find the time and inclination to put them together ever since, but a friend moving onto a nearby quinta with no cooking facilities finally spurred me into action. In my head, I’d already worked out exactly how the stove was to be made, so it took very little time to assemble. In fact, it all happened so quickly, I didn’t even get any ‘before’ photos.

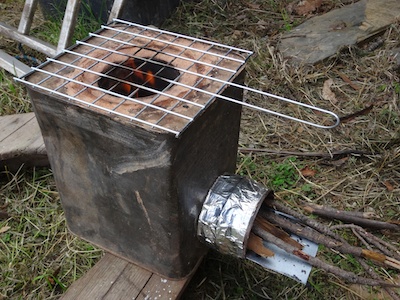
The stove comprises two identical 1-litre tins (which previously held linseed oil) with tops and bottoms removed, contained in a 5-litre rectangular tin with a top opening which looked (and smelled) like it had been used to store the resin that people collected from the Maritime pines to make turpentine. Whatever it was, it was so ancient and resinous it wasn’t coming off in any hurry so I simply left it.
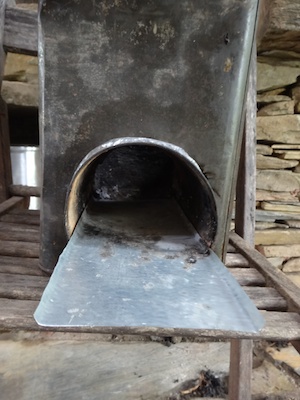
I cut a circular opening in one side of the 5-litre tin and inserted one of the 1-litre tins into the opening to form the horizontal burn tube. The splayed edges of the circular hole were used to hold the tin in place. Later I fastened them with wire and then covered the lot with aluminium tape.
I filled the base of the 5-litre tin with Leca (lightweight expanded clay aggregate) and then used a fireclay and sand mixture to shape an elbow between the burn tunnel and what would be the vertical heat riser formed by the second 1-litre tin. Using clay/sand for this not only saves messing about cutting metal, but gives some weight to the stove so it’s not easily accidentally knocked over. It will last longer than the metal too.
As I built the elbow, I filled the surrounding area with Leca. Once I’d reached the level for the placement of the second tin, it was all left to dry out completely.
The Leca insulates the combustion area, ensuring the fire burns hot and keeping the outside of the 5-litre tin comparatively cool. (It does still get quite hot, but not hot enough to burn skin or surrounding materials.)

Once dry, the second tin was put in place, the fireclay and sand mixture used to seal the tunnel, and the space around the heat riser filled with Leca. The area around the neck of the heat riser was filled with more fireclay and sand to seal the unit.


A piece of zinc sheet was then cut and folded to form a ‘grate’ which simply finds its own level in the burn tunnel and protrudes from it a way to support longer sticks being burned. It finishes midway across the elbow between the burn tunnel and heat riser to allow the air flowing underneath it to reach the fire. As air is drawn in underneath, it’s warmed as it goes, and keeps the fire burning hot. The zinc sheet is easily removed for cleaning or transport.
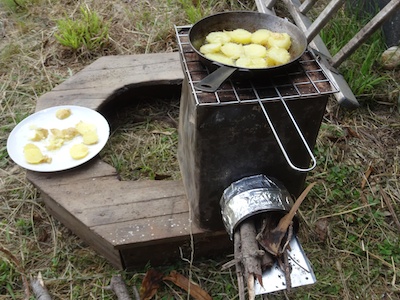
A barbecue grill piece completes the stove, allowing combustion gases to escape round the sides of pans.
The stove lit easily, boiled a pan of water in 5 minutes, and sautéed some potatoes all on a handful of small sticks. It also stank of vaporising turpentine! In time, this will hopefully disappear.


Unfortunately, it took me so long to get around to the second stage of construction, the friend I was making it for had already got herself a camping stove and gas bottle. Still, I did eventually get it to her when the gas ran out …


David November 9, 2014
Fantastic. Well thought out. I have used these for fires simply by cutting two holes in and putting flexi pipe in one as a chimney and fill it with stocks and hey presto. however this is in another league. Seeing how you used a feed pipe was the first nice idea,then making an elbow and surrounding the second upper pipe with the mix just spot on. This must stay warm for a good while. do you think you could use this in a large van?
I would love to have tge confidence to build this but but id get as far as the mix. Brilliant top recycling there thankyou for sharing, ps if you are in Uk and willing to make another It would be great to watch. I would Cover all costs for materials and time.
Regards
David
Quinta do Vale November 9, 2014
Hi David. Thanks for the thumbs up. It really isn’t hard to do. Why not just find yourself some tins in the rubbish and play around with them? If you’re not paying for materials you can have as many goes at it as it takes. I wouldn’t use it in an enclosed space like a van though. You’re going to get a dangerous build up of combustion gases. This is a stove for outside use only. Good luck!
verity November 24, 2015
Hi, Ive just stumbled across your blog and am excited at the wealth of information you’ve got on here. We have just bought a house in the south of spain and are at the beginning of our journey.
We have also been looking into rocket stoves, and this is a great article. would you mind if I put a link onto my page about your website?
Youre welcome to nose around my blog but its bare bones at the moment and we are at the very beginning of our journey.
Thanks again for a wealth of knowledge (I will definitely be peeking again to steal ideas)
Verity
Quinta do Vale November 25, 2015 — Post author
Hi Verity. For sure. There’s nothing to steal here as it’s all freely available for anyone who finds it useful. That’s kind of the purpose of putting it all online – a way of passing it on, since there’s not much I’ve done that hasn’t been inspired by the work of others or done in cooperation with them. Good luck on your journey!